Pepita and Chocolate Christmas Trees
Get into the festive spirit with this deliciously simple and unique recipe!Fun fact: The Pepita is harvested from specific pumpkin varieties know as Styrian or Oil Seed Pumpkins.
Equipment
- 1 Glass Bowl
- 1 Saucepan
- 1 Tray
Ingredients
- 500 Grams JC's Natural Pepitas
- 350 Grams Dark Chocolate Chips
- Ice Cream Cones
Instructions
- Place the dark chocolate drops into a clean glass bowl over a saucepan of simmering water.
- Melt the chocolate, stirring to combine. Do not let the water underneath boil as this will burn the chocolate. Once completely melted, turn off the heat.
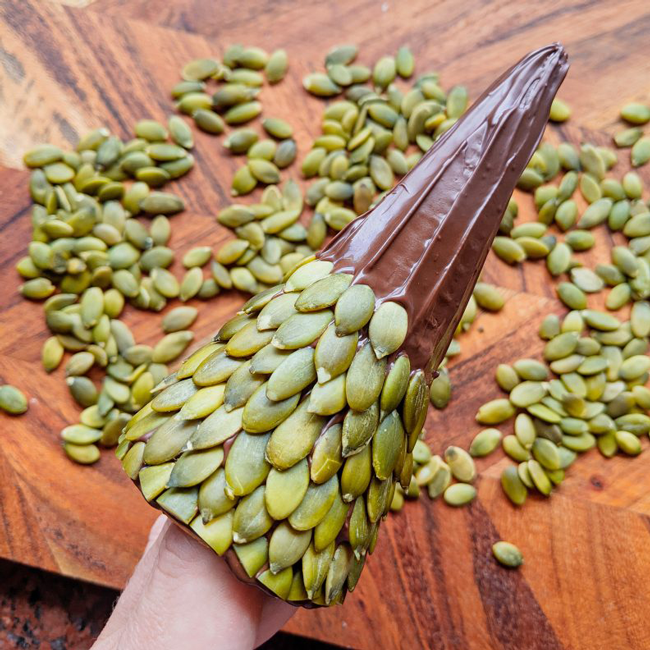
- While the chocolate is melting, pour out the pepitas onto a tray or large plate. Chop 10 pepitas in half to start (you will need more later) and set to one side.
- Here is where it can get messy! Using one hand to hold an ice cream cone, spoon over the melted chocolate to create a thin layer of chocolate. You shouldn’t be able to see the cone through the chocolate, so add a bit more if needed.
- Starting with the half pepitas, stick these to the chocolate cone around the edge going all the way around.
- Using the rest of the pepitas you have 2 options:1. Fiddly and time-consuming option: Place the pepitas one-by-one onto the chocolate cone, all the way around, layering them over top of the ones below. Continue going up the cone layer by layer until it is covered. If the chocolate starts to set, you may need to add a bit more melted chocolate as you go to make sure the pepitas stick.2. Quicker option: Roll the chocolate cone through the laid out pepitas to get a full layer. Carefully press them down to ensure they are stuck and add in more pepitas to fill any gaps
- Stand the trees up on a board or plate, then leave the trees to set in the fridge.
- Once set you can use them to decorate a Christmas cake, use them as part of an edible table decoration, or just eat them as a treat!